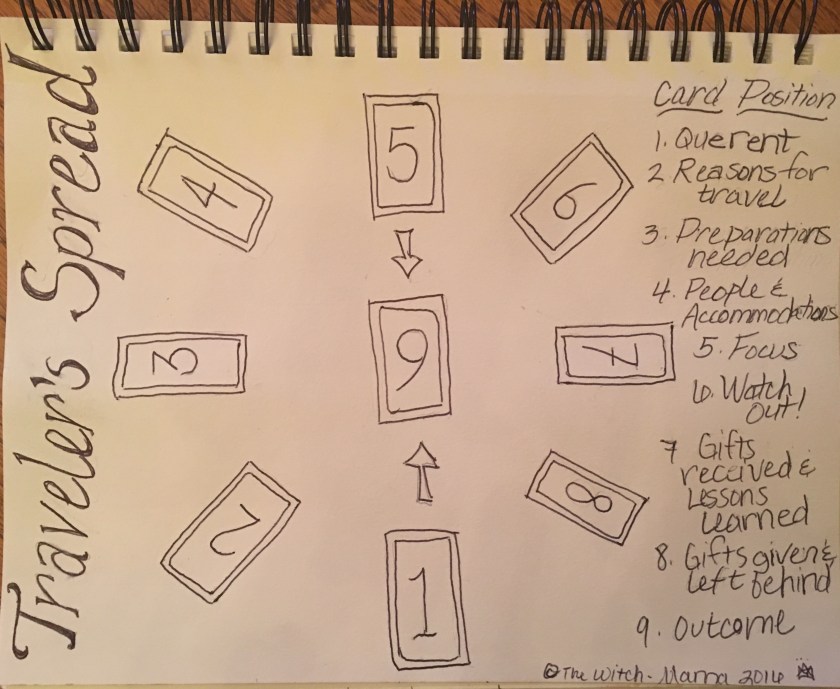
The Traveler’s Spread

IMG_3392.JPG

Card 1. The Querent

Card 2. Reason for the trip

Card 3. Preparations needed

Card 4. People you will meet and accommodations

Card 5. Focus of the trip

Card 6. Watch out!

Card 7. Gift received or lessons learned

Card 8. Gifts given or what you leave behind

Card 9. Outcome

So here is an example reading using The Traveler’s Spread. Querent was a young woman traveling south and teaching yoga workshops along the way.

img_3362

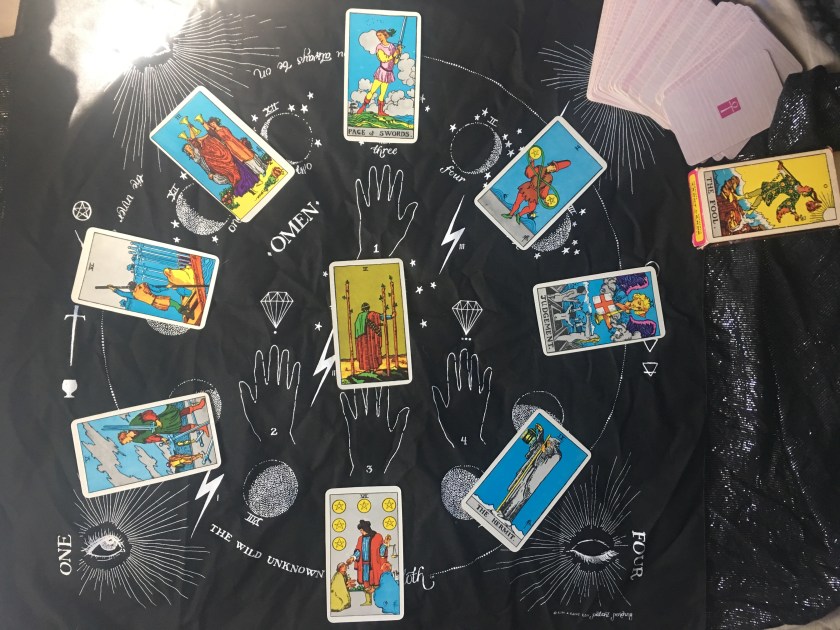
Card 1 -6 of Pentacles – she is sharing resources. There is an even exchange of money spent and experience gained. Hey – trips can be expensive! And this woman was going to be teaching yoga workshops along the way, so this looks good!

Card 2- 5 0f Swords – time to get out of a no win situation.

Card 3 – 6 of Swords – look at that progression. Taking off is the right thing to do. Make sure to keep your focus. Declutter – don’t overpack!

Card 4- 3 of Cups – how great is that? She will meet lots of new friends and have a good time.

Card 5 – Page of Swords – A young person who is ready to try her new idea! This trip will focus on self growth and discovery.

Card 6 -Two of Pentacles – what is this warning – handling too much? Overspending? Meeting someone shady? I reiterated the need to be careful with her money and watch out for people who may misrepresent themselves (reflects back on card 2)

Card 7 – Judgement – WOW! Two major arcana say pay attention! This trip will be life altering! Transformative!

Card 8 – The Hermit – This card does represent finding a teacher. Maybe she will leave people seeking more? Or maybe a special some one will be missing her….

Card 9 – 3 of Wands – This trip will leave her full of ambition and planning for more!

So overall, a great reading about what looks to be a very transformative trip!

I would love to hear how you would adjust the card meanings (nothing yet about “Will my car break down?”) or interpret this yourself in the comments.

Safe travels! Thanks for stopping by!

Silk Dying Tutorial

  This week my family hosted a Waldorf inspired silk dying day. We used Kool Aid to dye the silk. It was really fun and worked surprisingly well!

 Here’s how to do it:

We ordered bolts of silk from Dharma Trading Co.

First, soak your silk in equal parts hot water and white vinegar.

While it is soaking, prepare your dye bath:
3 Kool Aid packets
2 cups hot water
2 cups vinegar

The kool-aids we used were cherry, grape, orange, lemonade, lemon – lime, and blue raspberry.

Put your silk in the dye bath and stir for two minutes. You might want to wear gloves and aprons. It’s really cool to watch the silk absorb the color and the water turn clear.

Rinse the silk in cool water until the water runs clear.

Hang your silk to dry.

We got very creative making rainbow play cloths.

And tie dyes.

And bellydance veils.

My boys made juggling cloths.

Some folks dyed yarn.

It’s beautiful to watch my fairy girl dancing with her silks.
These sites were inspirational:
And now I want to make these butterfly wings:

Homemade Paper Bag Ostara Baskets

  15 years ago, my children, grandmother and I made a basket from paper bags.  I still have this basket; it has survived floods, toddlers, and blizzards.  I was going through our house, looking for baskets for our upcoming Waldorf home school day.  I realized that this paper bag basket would be a great basket to grow wheat grass in.  It would also be an appropriate Brigid activity because of the weaving.

This is my first tutorial, so follow along carefully, but use your own intellect and experience as we go.

Here’s how they are made:
You will need

nine paper grocery bags ( I use Aldi bags, of course!)

a yard stick or ruler
a pair of scissors
a sturdy stapler
glue 

Cut twelve pieces of paper bag paper 20″x16″

and cut another six pieces 28″x16″

That’s 18 all together!

Fold them as if you are folding double fold bias tape:

Fold them to the middle, then unfold.

Then fold the edges to the middle

then again fold to the middle

then again in half. They will measure approximately 1 ” wide

Rub them over a counter to make really sharp folds.

Choose one of the longer strips to be the top edge.

Evenly space 12 of the 20″ strips from the top edge and staple them in place.

(This also looks like a hula skirt!)

 
Fold 6 of those strips to the opposite side and staple them.

Then begin weaving in the remaining 6 strips, as if you are making a lattice pie crust, and staple them to the opposite side.

Now weave four of the last strips around the width of the basket from the bottom up. Overlap their edges and staple them to themselves. if possible, hide the staples under the horizontal strips.

Your basket should now appear mostly done.

 Use the last strip to cover the top heavily stapled strip and glue it in place.

If you would like a handle, you could punch a hole and sew or use a  manilla envelope fastener. You could also make a handle by making one of the strips as long as possible and weaving it all the way through.

My basket looked especially good today, since it was holding all the finished wedding invitations!

Wednesdays Waldorf- Inspired Homeschool day is looking very fun.